

8 of Banff National Park’s best day hikes
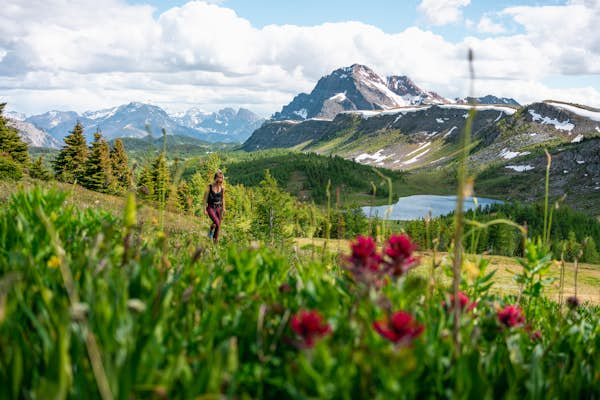
With its reputation for delivering some of Canada’s most iconic scenes on a sweeping scale – think unbelievably blue lakes backed by majestic snow-capped peaks – it’s easy to see why Banff continues to reign as the country’s most-visited national park. More than four million people visit the park annually, yet it’s surprisingly easy to get away from the throngs of tourists, thanks to an extensive maintained system of 1600km (1000 miles) of hiking trails.
Some of the most popular tracks start directly from the Lake Louise and Banff townsites, with others easily accessible via the park’s shuttle and transit options. From short family-friendly outings to full-day adventures to challenge more experienced hikers, here are Banff’s best day hikes for every skill level.
1. Vista Lake
Best one-hour hike
1.4km (0.8 miles) one-way; 60 to 90 minutes; easy
Lake Louise doesn’t have a monopoly on stunning mountain lakes. You can see the blue-green Vista Lake straight from the parking lot, but it’s well worth the short and sweet downhill stroll to its shores. What goes down must come up, though. It’s about a 120-m (400-ft) climb back up to the parking lot, so make sure your water bottle is full.
Then again, if one hour doesn’t seem to be quite enough, continue down the trail another 3.6km (2.2 miles) and you’ll arrive at Arnica Lake. It’s a challenging but rewarding 580-m (1900-ft) climb along the Continental Divide through fields of alpine wildflowers (in the summer months) and golden larch trees (in the autumn).
Start/finish: This out-and-back hike can be accessed from the clearly signed Arnica Lake trailhead on Hwy 93, about 8km (5 miles) south of Castle Junction on the south side of the road. The parking lot is small, so it pays to arrive early, especially during the autumn larch season.
2. Sunshine Meadows
Best for families
10km (6 miles) of trails to choose from; 4 to 5 hours; easy to moderate
In the summer, Sunshine Village – one of Banff’s most popular ski resorts – transforms into Sunshine Meadows: a family-friendly hiking oasis with over 10km (6 miles) of trails to choose from.
This really is a choose-your-own-adventure destination, with the added bonus of a fun gondola ride up to the trailheads. (In other words, you can reach such great heights without actually having to hike up to them.) There are relatively flat options available for little ones, but the most popular trail crests the Continental Divide to a viewpoint at Rock Isle Lake.
Start/finish: Sunshine Village ski resort can be found 8km (5 miles) west of Banff on Hwy 1. A free shuttle operates daily from the Banff townsite, with no reservations necessary. However, to access hiking trails, you must pay for the gondola ($68 adults; $19 children) from early July to early September.

3. Bow Glacier Falls
Best half-day hike
4.6km (2.9 miles) one way; 3 hours round trip; moderate
The only thing more captivating than a Rocky Mountain alpine lake? A Rocky Mountain waterfall. There are countless breathtaking falls to stop at as you drive north of Banff towards Jasper on the Icefields Parkway (Hwy 93), but it’s worth it to get out of your car and hike to some of the best ones.
Bow Glacier Falls sits firmly on this list, which is why this half-day hike ranks highly as a favorite of locals and visitors alike. Created by the Wapata Icefield melting and later turning into the Bow River (the same river that later flows past the Fairmont Banff Springs), Bow Glacier Falls tumbles off a rugged rock face. This scenic but relatively easy trail (with just 155m or 508ft elevation gain) follows the edges of Bow Lake before arriving at the falls.
Start/finish: The trailhead can be found on Hwy 93, 36km (22 miles) north of the Lake Louise junction, about 400m (0.25 miles) down the Num-ti-jah Lodge access road.
4. Katherine Lake via Helen Lake
Best full-day hike
16.6km (10.5 miles) round trip; 7 to 8 hours; moderate to difficult
The hike to Helen Lake – widely considered one of the best day hikes along the Icefields Parkways – isn’t exactly a hidden secret. This stunning lake – about 6km (3.7 miles) down the trail on a moderate trail that includes a steady 455-m (1490-ft) elevation gain and some small creek crossings – is nestled in a valley, surrounded by a meadow of wildflowers and towering mountains.
But if you’ve got some extra gas in the tank, use it to follow the signposts further along the trail for views of the much larger Katherine Lake. Then again, more experienced hikers may prefer the scrambling route to the top of the 2993-m-tall (9820-ft-tall) Cirque Peak, which offers impressive views of the surrounding lakes and glaciers.
Start/finish: The parking lot for the trailhead can be found on Hwy 93, roughly 33km (20 miles) north of the Lake Louise Junction on the east side of the road across from the Crowfoot Glacier viewpoint. Arrive early, as the parking lot fills quickly.

5. Johnston Canyon
Best winter day hike
1.1km (0.7 miles) one-way to the Johnston Canyon Lower Falls or 2.7km (1.7 miles) one-way to the Johnston Canyon Upper Falls; 1 to 3 hours; easy
With its easy grade and suspended catwalks to both the lower and upper falls, Johnston Canyon is a popular walk year-round. But it’s in the winter (from December until March) that the gorge is transformed into a crystalline playground, with its frozen waterfalls and pillars of ice making it a favorite with ice climbers.
Not interested in scaling a wall of ice? The good news is that you don’t need to wield an ice-ax to experience the wintery wonderland. Strap on some ice cleats or crampons and grab some poles (both available for rental at outfitters in the town of Banff, including Snowtips Backtrax) or sign up for a guided tour with a local operator such as Discover Banff Tours.
Start/finish: There are two parking lots at the Johnston Canyon day-use area, found along Highway 1A, about a 25km (15.5 miles) west of Banff. Even during winter, the parking lots can fill up by midday, so plan your visit according.
6. Peyto Lake Viewpoint
Best accessible hike
0.6km (0.4 miles) one-way; 30 minutes round trip; easy
Want maximum payoff for the least amount of effort? We’ve got you. This 0.6-km (0.4-mile) walk takes you up to a viewing platform that looks out over the turquoise waters of Peyto Lake, with a barrier-free 0.3-km (0.2-mile) trail available from the upper parking lot, making this a great option for those with limited mobility or wheelchair users.
Still got some energy to burn? Continue along the short nature trail; 0.6-km (0.4-mile) loop that will take you through the surrounding forest.
Start/finish: The trailhead can be found on Hwy 93, about 40km (25 miles) north of the Lake Louise junction at the Peyto Lake parking lot.

7. Big Beehive
Best for photographers
5km (3.1 miles) one-way; 4 hours round trip, but budget extra time for tea at the Lake Agnes teahouse; moderate
As you walk along the north shore of Lake Louise and begin your climb up towards the Lake Agnes teahouse, you’ll probably find yourself wondering, “Wait, I thought Lonely Planet said we’d get away from the crowds?” Have patience and trust. The first 3.4km (2.1 miles) of this wide, well-maintained trail surely has to be one of Banff’s most highly trafficked, with more hikers lured the 385m (1260ft) uphill by the promise of fresh scones at the European-style teahouse, which has been serving hikers since 1905.
But once you pass the historic teahouse (open June to October) and behind Lake Agnes, the crowds thin out considerably. From here, it’s just 1.6km (1 mile) via a series of switchbacks up to the top of the Big Beehive. The payoff? Picture-perfect panoramic views of Lake Louise and the Fairmont Chateau Lake Louise below. It’s particularly stunning after snow but be aware that this trail is at risk of avalanches.
Start/finish: Upper Lake Louise parking lot is 4km (2.5 miles) from the village of Lake Louise. Parking is at a premium here (and isn’t free), so unless you’re setting out at 4am, it’s highly recommended that you pre-book a shuttle if visiting in June through September.
8. Burgess Shale and Stanley Glacier Fossil Hike
Best for amateur geologists
10km (6.2 miles) return with 385m (1260ft) elevation gain; 8 hours; moderate
This moderately difficult hike technically isn’t in Banff National Park, but if you’re a geology nerd or have dinosaur-loving kids, you won’t regret making the drive just over the Alberta-British Columbia border into Kootenay National Park.
The well-preserved fossils of the Burgess Shale – the site of a shallow sea around 508 million years ago, well before dinosaurs roamed – can be found here high in the mountains. After walking through forests of wildflowers, towering pines and rushing waterfalls, you’ll arrive in the Stanley Glacier basin, where there are trilobites, hyolithids, brachiopods, and sponges from the Eldon formation, which visitors are welcome to handle. Have no clue what exactly that means? Don’t worry; Parks Canada staff will explain all on a guided hike ($80; reservations must be made in advance).
Start/finish: The Stanley Glacier parking lot is 15km (9.3 miles) south of Castle Junction on Hwy 93 in Kootenay National Park.
Tips for hiking in Banff National Park
- Banff National Park is home to both black bears and grizzly bears. Always carry bear spray – and know how to use it – when hiking. Bear spray can be rented from outdoor outfitters in the Banff township, including at Snowtips Backtrax, with staff happy to explain its use.
- Make plenty of noise as you hike, but don’t bother with bear bells. The soothing tinkle is far too quiet to keep bears at bay. Instead, experts recommend using large bursts of sound to alert bears that you’re nearby. Try clapping or yelling “Hey bear!” as you come around blind corners or walk through brushy areas.
- Elk – which are frequently spotted in and around Banff – can be aggressive and attack without warning, particularly during the spring calving season and the fall mating season. Always keep a safe distance.
- Stay hydrated. The town of Banff sits around 1383m (4500ft) in elevation and if you’re hiking, there’s nowhere to go but up. If you’ve just arrived from closer to sea level, you may need a day or two to acclimatize before tackling the more difficult trails. (Calgary, which sits at an elevation of 1045m or 3428ft, is a great and often more affordable place to do this.)
- Planning a hike at Lake Louise? Expect the parking lot (which is paid) to fill up well before sunrise. If you’re not a super-early-bird, booking a shuttle in advance from the Lake Louise or Banff townsites is your best bet. Likewise, Moraine Lake is now only accessible by shuttle.
- Plan your trip for July through September. In June, high-mountain passes will still be impassable due to snow or may be muddy due to the thaw. Always check trail conditions with Parks Canada prior to heading out.


Sofia Coppola Talks About Her Beauty Journey and New Collab with Augustinus Bader
Beauty
Here’s What Beauty Experts Have to Say About 5 Holy Grail Skincare Products
Before making the investment in Dr. Sturm’s Hyaluronic Serum or Augustinus Bader’s face cream, see what beauty industry insiders actually think about these cult products.
12.05.2020 by Sophie Shaw

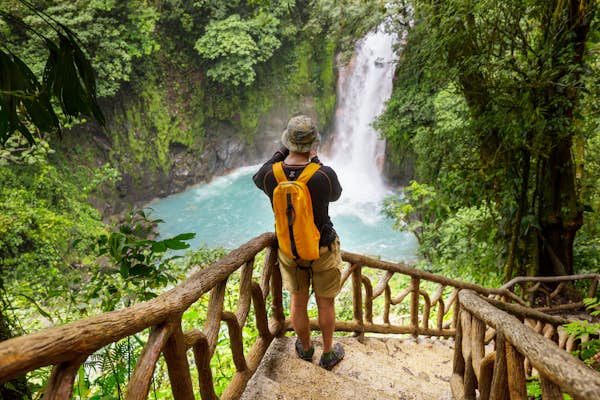
13 essential things to know before visiting Costa Rica
Adrenaline-pumping activities, pristine beaches, untamed forests, show-stopping wildlife and a culture of welcoming visitors all serve to make Costa Rica an irresistible destination for adventurous travelers.
In 2019, Costa Rica received the Champions of the Earth award, the United Nation’s highest environmental honor – high praise indeed!
You’ll hear the term “pura vida” – literally, “pure life” – everywhere you go in Costa Rica. More than just a phrase, it’s a philosophy of living in the moment, finding joy in simple things and respecting nature. Most visitors quickly fall in love with the Ticos’ unhurried way of life.
But how safe is travel in Costa Rica, what do you need to pack and what do you need to know about the local etiquette? Here’s our guide to the most important things you need to know before you go.

1. How much time do I need in Costa Rica?
You could stay for weeks in Costa Rica without running out of things to do, but you can also squeeze a lot into a week if time is short. If you’re traveling to this accessible corner of Central America from the US, you can enjoy even shorter trips, perhaps even a long weekend.
But remember, although the country appears to be small, getting around will take longer than you think.
If you’re short of time and looking for memorable outdoor adventures, head to either La Fortuna and the Arenal volcano, or the dense forests of Monteverde. If you’re craving a beach break, fly into Liberia – close to the beaches lining the Pacific Coast – rather than San José.
On the Pacific shore, you can combine surf and jungle adventures in as little as a week; if you have longer, go off-the-beaten track on the biodiverse Osa Peninsula or explore the wild beaches along the Caribbean coast.
2. Costa Rica has two seasons but pack for four
Officially, Costa Rica has two seasons. The dry season runs from December to March – the driest and hottest month, when the temperature hovers around 35°C (95°F). The rainy season runs from May through to November, with September and October being the wettest months.
But the country has a multitude of microclimates. Rainforest trails tend to be hot and steamy, but it can get chilly when you enter Costa Rica’s lofty cloud forests.
Alongside T-shirts, shorts and flip-flops, pack a raincoat and a fleece or warm jacket, waterproof hiking boots, closed-toe hiking sandals, a rash guard and lightweight, quick-dry clothing.
Rain can arrive without warning so bring a dry bag or other waterproof gear to protect your valuables. Don’t forget high-factor, water-resistant sunscreen and bug spray; both will be cheaper at home.

3. Plan ahead if you’re traveling at peak times
Book your accommodation well in advance if you plan to visit Costa Rica at peak times such as Christmas, New Year, Easter or the US spring break. Prices also rise during major festivals and events, and high-end restaurants and popular tours should be booked ahead of time.
4. Carry a mix of cards and cash
The colón is Costa Rica’s official currency, but US dollars are widely accepted. Carry a mix of both, with a stash of small bills for tipping, taxis, small shops and local restaurants. You can pay for everything else with credit and debit cards.

5. To tip or not to tip?
Tipping is optional in Costa Rica but a tip is much appreciated by hard-working guides and drivers. Aim for around 10% of the tour price, or more if the service is exceptional. Restaurants are required to add a 10% service tax to your bill as well as a 13% sales tax, but top it up if you feel your server went the extra mile.
6. Do I need to speak the lingo?
English is widely spoken in Costa Rica, but a little Spanish goes a long way. Rolling out a few polite phrases will be met by big smiles from locals. Add the phrases buenos días (good morning), por favor (please) and gracias (thank you) to your lexicon.
Another useful Ticos phrase is pura vida, which can be used to say everything from “hello” and “goodbye” to “what’s up?” or “that’s great.”

7. Respect the flora and fauna
Costa Rica is famed for its dazzling biodiversity. This small Central American nation is home to an estimated 5% of the world’s plant and animal species, with around 28% of its landmass under protection.
Locals take conservation seriously; Costa Rica generates 99% of its electricity from renewables and aims to be carbon neutral by 2050.
To play your part, choose lodgings with sustainable practices (look out for the Certification of Sustainable Tourism), travel with ethical tour guides and eat local. Always keep your distance from wild animals – use a zoom lens or binoculars to see wildlife up close.
Costa Rica was the first country to launch a #stopanimalselfies campaign, so decline offers of photo opportunities with animals. And national parks have banned single-use plastics, so carry a reusable water bottle.
8. Is Costa Rica safe?
Costa Rica is generally safe, although petty crime does occur. Take the usual precautions and don’t flash expensive possessions.
Avoid carrying all your credit cards together in one place, and if you need an ATM, try to use one inside a bank during the daytime. Foreign visitors are asked to carry their passports at all times but the police will usually accept a photocopy.
Watch out for pickpockets in busy areas, such as bus stations and markets, and keep an eye on your belongings on buses and beaches. Steer clear of poorly lit streets and avoid wandering around dodgy neighborhoods alone after dark – seek local advice on spots to avoid.
If you visit bars and clubs, don’t leave your drink unattended, as there have been reports of spiking. In case of emergency, call 911.

9. Don’t climb Arenal Volcano
Up until 2010, Volcán Arenal’s lava pyrotechnics thrilled onlookers. Now in a resting phase, its picture-perfect cone may look ready for climbing, but resist the temptation unless you’re a permit-carrying volcanologist – it’s illegal and could get you fined.
Instead, you can crunch over its lava-covered lower slopes on a variety of hiking trails or get active in the surrounding national park. Make time for mountain biking, horseback riding, rappelling and ziplining, or kayaking and windsurfing on nearby Lake Arenal, then relax in the region’s natural hot springs.
10. Keep healthy and avoid bug bites
Costa Rica’s healthcare system is ranked among the best in the world (according to the United Nations and the World Health Organisation), but you’ll have to pay for treatment, so it’s always wise to take out travel insurance with cover for medical care.
Malaria is rare but local mosquitoes can carry other nasty diseases such as dengue and Zika, particularly in low-lying urban areas and along the coast. The best way to avoid bug bites is to use insect repellent containing at least 20% DEET (diethyltoluamide), covering up bare skin, particularly in the evenings.

11. Stay safe in the surf
Costa Rica is a great place to surf, with cool surf camps and year-round rollers along the Pacific Coast. Playa Hermosa on the Nicoya Peninsula was declared Central America’s first World Surfing Reserve in 2022.
However, rip currents are common and you won’t always find lifeguards around, so look out for warning flags – a red flag indicates a danger zone, black means stay out of the water.
Don’t swim or surf alone. If a current starts to drag you out to sea, try to keep calm, shout for help, and swim parallel to the shore until you escape the current. And always check that rivers and lagoons are crocodile-free before diving in.
12. Be careful on the roads
Self-driving a hire car in Costa Rica offers the freedom to travel at your own pace, but there are a few things to consider. Most rental agencies require drivers to have comprehensive insurance in addition to purchasing mandatory liability insurance.
A 4WD is a must if you’re planning to tackle dirt roads; always check the vehicle’s condition and ensure it has all the necessary safety equipment, including a functional spare tire.
On the road, drive slowly and defensively. In case of a breakdown, call the rental company or 911; it can be risky to accept unsolicited help from strangers.
Never leave valuables unattended in your car, and try to use public parking lots with surveillance. Road trips always take longer than you think, so plan your journey ahead to avoid driving after dark.
13. Tap water is usually safe
With Costa Rica’s heat and humidity, it’s important to stay hydrated, especially if you’re doing anything active.
Tap water is normally safe to drink but if you’re going to remote rural areas or you’d rather not take the risk, save the environment (and some money) by investing in a water filter bottle such as the LifeStraw Go.